Navigating the world of Chromebook screenshots does not have to be a headache even without a Windows key. In this guide, we will unlock the secrets to capturing your screen like a pro. You are a student, professional or casual user mastering these techniques will boost your productivity and make sharing information a breeze. We will explore 10 foolproof methods from simple keyboard shortcuts to advanced Chrome OS tools ensuring you will find a technique that fits your style. Get ready to become a screenshot wizard and take your Chromebook skills to the next level
Can I screenshot it on my Chromebook?
Despite the absence of a Windows key Chromebooks offer a plethora of options for taking screenshots. In fact, Chrome OS has built-in functionality that makes capturing your screen a piece of cake. From keyboard shortcuts to stylus tricks. You will find a method that suits your style.
The myth of limited functionality fools you. Chromebooks are versatile machines when it comes to screenshots. They have got more than a few tricks up their sleeve. In the following sections, we’ll dive deep into each method, ensuring you become a screenshot pro in no time.
Importance of Taking Screenshots on Chromebooks
Taking screenshots on your Chromebook is not just a neat trick. It is a game-changer for productivity. For students, it is an invaluable tool for capturing lecture slides, annotating research materials or saving important information from online courses. Professionals can use screenshots to document processes, create visual aids for presentations or quickly share ideas with colleagues.
But the benefits do not stop there. Screenshots are crucial for troubleshooting tech issues, providing visual evidence for customer support or simply saving a funny meme for later. With the ability to capture and share information visually. You will find yourself working smarter, not harder. It is no wonder that mastering Chromebook screenshot techniques has become an essential skill in our digital age.
Can the screen on my Chromebook be replaced?
While we’re on the topic of Chromebook screens, it’s worth addressing a common concern: screen replacement. The good news is that yes, in most cases, Chromebook screens can be replaced. The process and feasibility can vary depending on your specific model.
Before attempting a DIY replacement consider factors such as warranty status, cost of replacement parts and your technical expertise. In many cases, it is best to consult with a professional or the manufacturer for guidance. Remember, a properly functioning screen is crucial for taking great screenshots, so don’t hesitate to address any screen issues promptly.
Read More: Fashion 6 Cell 10.8V 4001mAh-5000mAh Replacement Laptop Battery for asus
How do I screenshot on a Chromebook Lenovo?
Lenovo Chromebook users, rejoice! Taking screenshots on your device is just as straightforward as on any other Chromebook model. The standard Chrome OS shortcuts apply, but Lenovo sometimes includes additional features that can enhance your screenshot experience.
To capture your entire screen on a Lenovo Chromebook, simply press the Ctrl + Show Windows keys simultaneously. For a partial screenshot, use Ctrl + Shift + Show Windows. These shortcuts work across all Chromebook models, ensuring consistency no matter which brand you’re using. Some Lenovo models may also offer touchscreen or stylus options for even more versatile screenshot capabilities.
Where are my screenshots saved on a Chromebook?
After mastering the art of taking screenshots, you might wonder where these digital captures end up. By default, Chrome OS saves all screenshots to the Downloads folder. This makes them easy to find and access whenever you need them.
To locate your screenshots, simply open the Files app on your Chromebook. Look for the Downloads folder in the left sidebar. Inside, you’ll find all your screenshots, typically named “Screenshot” followed by the date and time they were taken. From here, you can easily organize, rename or share your screenshots as needed. It is a straightforward system that keeps your visual captures right at your fingertips.
How do I take a screenshot on a Chromebook without a keyboard?
In our increasingly touch-oriented world. It is not uncommon to find yourself using a Chromebook without a physical keyboard. Fear not – you can still capture those all-important screenshots. For touchscreen Chromebooks, Chrome OS offers on-screen keyboard options that include screenshot functionality.
To access the on-screen keyboard, click on the time in the bottom right corner of your screen, then select the keyboard icon. From there, you can use the same shortcuts as you would on a physical keyboard.
Some Chromebook models allow you to use the power and volume down buttons simultaneously to take a full-screen capture, much like on a smartphone. These methods ensure you’re never left unable to take a screenshot, regardless of your Chromebook’s configuration.
How can I take a screenshot on a Chromebook and crop it?

Capturing the perfect screenshot often involves more than just pressing a button. Sometimes you need to refine your image. Luckily, Chrome OS comes equipped with built-in tools for cropping and editing your screenshots. This feature allows you to focus on the most important parts of your capture without the need for additional software.
To crop a screenshot, first take your capture using any of the methods we have discussed. Once the screenshot is saved, locate it in your Downloads folder and open it with the Gallery app. Look for the crop icon (usually represented by overlapping right angles) in the top toolbar. Click and drag to select the area you want to keep, then hit the “Crop” button to finalize your edit. With this simple process. You can quickly refine your screenshots for maximum impact.
What if your screen on Chromebook is black?
A black screen on your Chromebook can be a frustrating roadblock, especially when you’re trying to take a screenshot. This issue can stem from various causes, ranging from simple software glitches to more serious hardware problems. Before panicking, try these troubleshooting steps:
If these steps do not resolve the issue, it might be time to seek professional help. Contact Chromebook support or visit an authorized service center to diagnose and fix the problem. Remember a functioning screen is crucial not just for screenshots, but for overall usability of your device.
- Adjust the brightness Sometimes the screen might appear black if the brightness is set too low. Use the brightness keys to increase the screen’s luminosity.
- Perform a hard reset: Press and hold the refresh key and power button simultaneously for about 10 seconds, then release and power on the device.
- Check for external display issues: If you’re using an external monitor, ensure all connections are secure and try disconnecting it to see if the built-in display works.
How do I take a screenshot on your Chromebook using a keyboard?
Taking screenshots using your Chromebook’s keyboard is arguably the quickest and most efficient method. The beauty of Chrome OS lies in its simplicity, and the screenshot shortcuts are no exception. Let’s break down the two primary keyboard methods:
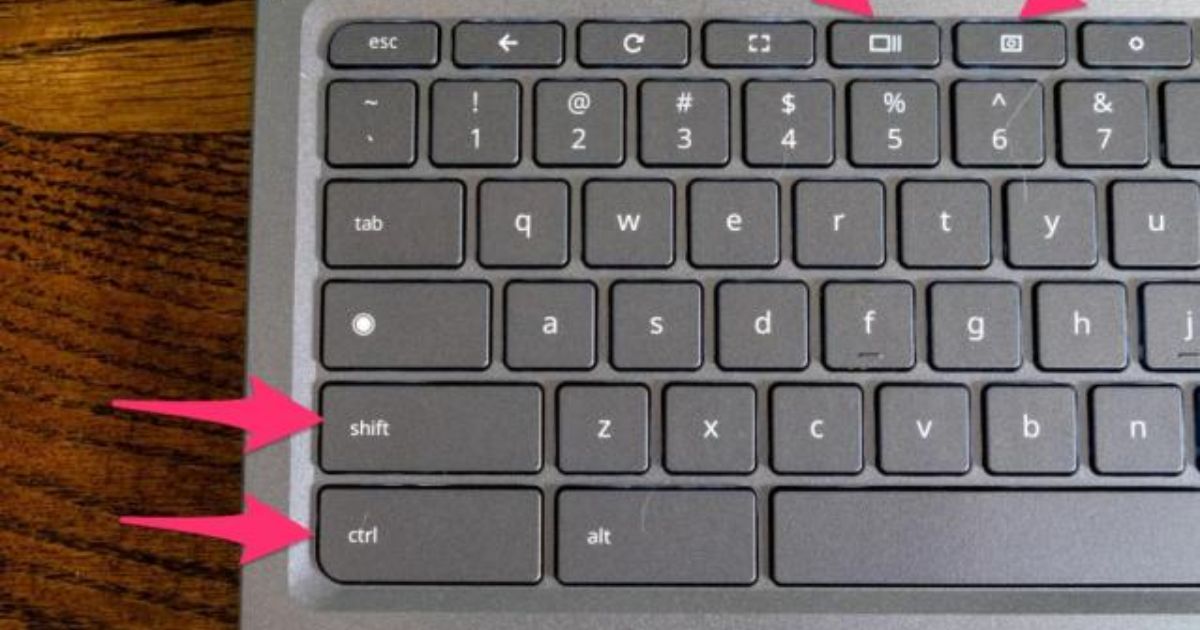
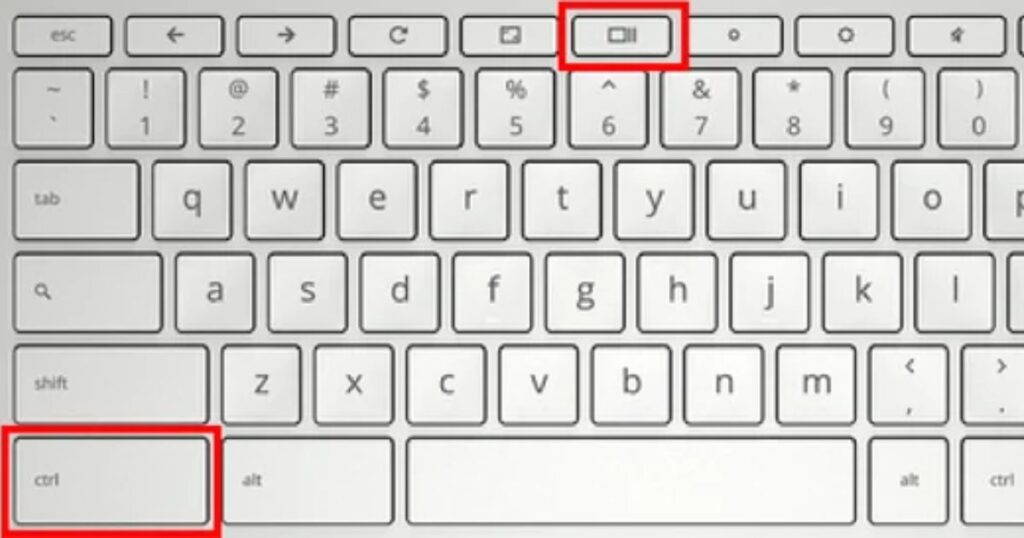
For a full-screen capture, press Ctrl + Show Windows keys simultaneously. The Show Windows key, which looks like a rectangle with two lines on the right is typically located in the top row of your keyboard, often where F5 would be on a traditional keyboard. This shortcut captures everything visible on your screen in one go.
If you need more precision, use Ctrl + Shift + Show Windows for a partial screenshot. This combination turns your cursor into a crosshair, allowing you to click and drag to select the exact area you want to capture. It’s perfect for focusing on specific elements without the clutter of your entire screen.
How To Screenshot On Chromebook Without Windows Key
Now that we’ve covered the basics, let’s dive into the heart of our guide: taking screenshots on your Chromebook without relying on a Windows key. Chrome OS offers a variety of methods, each suited to different scenarios and preferences. From keyboard shortcuts to touchscreen gestures. You’ll find a technique that feels natural and efficient for your workflow.
In the following sections, we will explore ten of the best methods for capturing screenshots on your Chromebook. If you are a keyboard shortcut aficionado, a stylus enthusiast or prefer using third-party tools, there is a solution for everyone. By the end of this guide, you’ll be equipped with a diverse toolkit of screenshot techniques, ready to capture and share information with ease.
Quick Settings is My Go-To for Chromebook Screenshots
For those who prefer a more visual approach. The Quick Settings menu offers a straightforward method for taking screenshots. This option is particularly handy if you struggle to remember keyboard shortcuts or if you’re using your Chromebook in tablet mode.
To access Quick Settings, simply click on the time in the bottom right corner of your screen. Look for the Screen Capture icon which resembles a square with a circle inside. Clicking this icon opens up a toolbar with various screenshot options, including full screen, partial and window captures. It is an intuitive method that puts all your screenshot tools in one easily accessible place.
Physical Buttons for the Quick Snap of Chromebook Screenshots
Sometimes, the simplest solutions are the most effective. If you’re using your Chromebook in tablet mode or just prefer a more tactile approach, you can use physical buttons to take screenshots. This method is particularly useful when your keyboard isn’t easily accessible.
To take a full-screen screenshot using physical buttons, simply press the Power button and Volume Down button simultaneously. Your Chromebook will capture the entire screen, just as if you’d used a keyboard shortcut. While this method doesn’t offer the precision of partial screenshots, it’s quick, easy to remember and perfect for those moments when you need to capture something in a hurry.
See Also: The Asus 2-in-1 Q535 Laptop Reviewed: A Versatile Powerhouse for Work and Play
Chrome’s Built-in Tool for Web Pages
When it comes to capturing web content, Chrome’s built-in screenshot tool is a game-changer. This feature allows you to take full-page screenshots, even of content that extends beyond what’s visible on your screen. It’s perfect for capturing long articles, entire social media feeds, or comprehensive web pages.
To use this tool, open the Chrome menu (three dots in the top right corner) and navigate to More Tools. Take Screenshot. You will be presented with options to capture the visible area or the entire page. This method is not only convenient but also ensures you get high-quality, full-page captures without the need for third-party extensions.
Stylus Adventures
For Chromebook users with a stylus, taking screenshots can be an intuitive and precise experience. Most stylus-enabled Chromebooks offer screenshot capabilities right from the stylus menu. Simply tap the stylus on the screen to bring up the menu, then select the screenshot option. You can choose between full-screen captures or use the stylus to select a specific area with pinpoint accuracy.
External Keyboard Shortcuts
If you frequently use an external keyboard with your Chromebook, you’ll be pleased to know that screenshot functionality extends to these devices as well. The shortcuts remain the same: Ctrl + F5 for a full screenshot and Ctrl + Shift + F5 for a partial screenshot. This consistency across internal and external keyboards ensures a seamless experience, regardless of your setup.
Chatting with Google Assistant
In the age of voice-activated technology, why not let Google Assistant handle your screenshots? If your Chromebook supports Google Assistant, you can simply say, “Hey Google, take a screenshot” to capture your entire screen. While this method doesn’t offer the flexibility of partial screenshots, it’s a hands-free option that can be incredibly convenient in certain situations.
Exploring Chrome Extensions for Chromebook Screenshots
For users who need more advanced screenshot capabilities. Chrome extensions offer a wealth of options. These third-party tools can add features like scrolling captures, annotation tools, and cloud storage integration. Popular extensions include Lightshot, Nimbus Screenshot, and Awesome Screenshot. Each offers unique features, so it’s worth exploring to find the one that best fits your needs.
Recommended Third-Party Extensions For Screenshotting Without The Windows Key
While Chrome OS offers robust built-in screenshot capabilities, third-party extensions can take your screenshot game to the next level. Here are three top-rated extensions that offer advanced features for capturing and editing screenshots:
- Lightshot: Known for its simplicity and quick editing tools, Lightshot allows you to capture, edit, and share screenshots in seconds. It offers a user-friendly interface and the ability to upload your captures directly to their server for easy sharing.
- Nimbus Screenshot: This powerful extension offers both screenshot and screen recording capabilities. It includes features like delayed captures, entire page screenshots, and the ability to capture specific browser extensions.
- Awesome Screenshot: Living up to its name, this extension provides a comprehensive suite of capture options, including full page, selected area, and visible part of the page. It also includes a robust set of annotation tools for post-capture editing.
Using the Chrome DevTools

For web developers or those needing more advanced screenshot capabilities, Chrome DevTools offers a powerful solution. This built-in feature of Chrome provides precise control over your captures, especially when dealing with web content.
To access DevTools, press Ctrl + Shift + I or right-click on a webpage and select “Inspect”. Once DevTools is open, use the command menu (Ctrl + Shift + P) and type “screenshot”. You’ll see options for full-size screenshots, captures of specific elements, and more. While this method requires a bit more technical know-how, it offers unparalleled control and is particularly useful for web development and design work.
Summary
Mastering Chromebook screenshots is easier than you might think. From simple keyboard shortcuts to advanced Chrome extensions, you now have a toolkit of 10 versatile methods at your fingertips. You prefer the quick tap of keys, the precision of a stylus or the power of third-party tools. There Is a perfect solution for every situation. Remember, practice makes perfect. Experiment with these techniques to find your favorites and streamline your workflow. With these skills, you will capture, share, and communicate more effectively than ever before. Happy screenshotting!
Frequently Asked Questions
Can I edit my screenshots after taking them?
Yes! Chrome OS includes a basic image editor. Open your screenshot in the Gallery app to access cropping, rotation and annotation tools.
How do I share my screenshots?
You can share screenshots directly from the Files app. Right-click on the screenshot and select “Share” to send via email, messaging apps or cloud storage services.
Are there keyboard shortcuts for taking screenshots of specific windows?
Chrome OS does not have a built-in shortcut for window-specific screenshots. You can use the partial screenshot method (Ctrl + Shift + Show Windows) to select a specific window manually.
Can I change where my screenshots are saved?
By default, screenshots are saved to the Downloads folder. While you can not change the default save location. You can easily move screenshots to other folders or cloud storage services after capturing them.
Do these methods work on all Chromebook models?
The keyboard shortcuts and built-in Chrome OS methods work on all Chromebook models. Some features like stylus support or tablet mode may only be available on specific models.